用开源模型 WizardCoder-15B 搭建文本生成网页应用教程
Making a web app generator with open ML models
Hugging Face 发布教程,讲解如何用 Node.js 和 Inference Endpoints 上的 WizardCoder-15B 实现文本生成网页应用,把模型输出以流式方式直接渲染成 HTML。
原文给出从模型部署到流式渲染的完整实现路径,读者可以照此搭建自己的文本生成网页应用服务。
随着越来越多的代码生成模型公开可用,我们现在能够以以前无法想象的方式实现文本到网页甚至文本到应用的生成。
本教程介绍了一种直接的 AI 网页内容生成方法,即一次性流式传输并渲染内容。
在此处尝试实时演示! → Webapp Factory
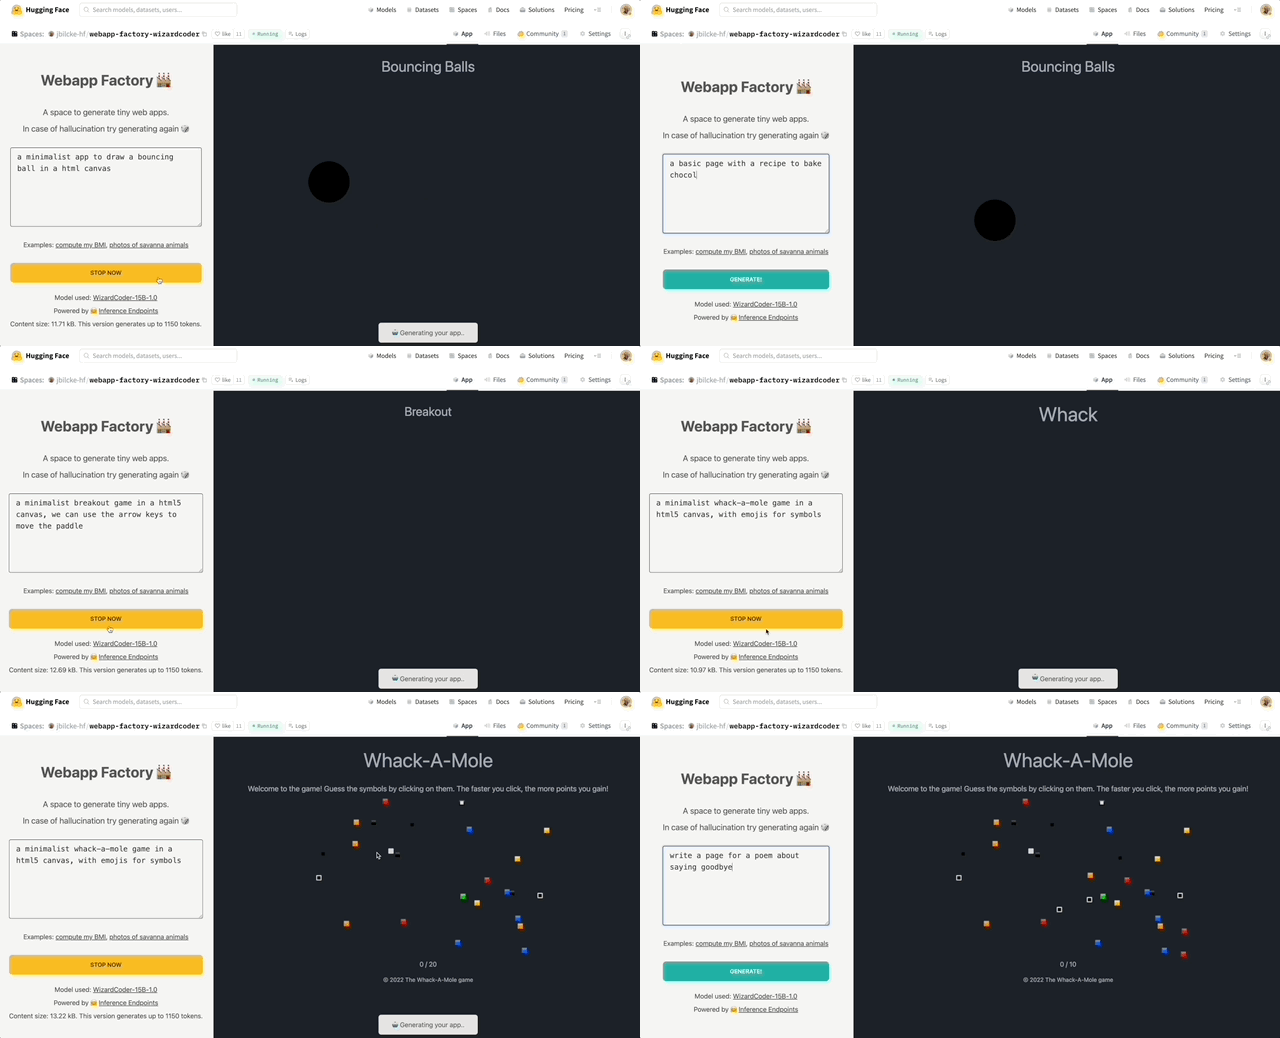
在 Node 应用中使用 LLM
虽然我们通常认为 Python 与 AI 和 ML 相关的一切都有关,但 Web 开发社区严重依赖 JavaScript 和 Node。
以下是在此平台上使用大型语言模型的一些方法。
通过在本地运行模型
在 JavaScript 中运行 LLM 有多种方法,从使用 ONNX 到将代码转换为 WASM,再到调用用其他语言编写的外部进程。
其中一些技术现在已经作为即用型 NPM 库提供:
- 使用 AI/ML 库,例如 transformers.js(支持 代码生成)
- 使用专用的 LLM 库,例如 llama-node(或用于浏览器的 web-llm)
- 通过桥接使用 Python 库,例如 Pythonia
然而,在这样的环境中运行大型语言模型可能会非常耗费资源,尤其是在你无法使用硬件加速的情况下。
通过使用 API
如今,各种云提供商都提供了使用语言模型的商业 API。以下是 Hugging Face 目前提供的服务:
免费的 Inference API,允许任何人使用社区中的中小型模型。
更高级且适合生产环境的 Inference Endpoints API,适用于需要更大模型或自定义推理代码的用户。
这两个 API 都可以通过 NPM 上的 Hugging Face Inference API 库从 Node 中使用。
💡 性能最佳的模型通常需要大量内存(32 Gb、64 Gb 或更多)和硬件加速才能获得良好的延迟(参见基准测试)。但我们也看到一种趋势,即模型在保持某些任务上相对良好结果的同时,体积不断缩小,内存需求低至 16 Gb 甚至 8 Gb。
架构
我们将使用 NodeJS 来创建我们的生成式 AI Web 服务器。
模型将是运行在 Inference Endpoints API 上的 WizardCoder-15B,但欢迎你尝试其他模型和技术栈。
如果你对其他解决方案感兴趣,以下是一些替代实现的指引:
初始化项目
首先,我们需要设置一个新的 Node 项目(如果需要,你可以克隆这个模板)。
git clone https://github.com/jbilcke-hf/template-node-express tutorial
cd tutorial
nvm use
npm install
然后,我们可以安装 Hugging Face Inference 客户端:
npm install @huggingface/inference
并在 `src/index.mts` 中进行设置:
import { HfInference } from '@huggingface/inference'

// to keep your API token secure, in production you should use something like:
// const hfi = new HfInference(process.env.HF_API_TOKEN)
const hfi = new HfInference('** YOUR TOKEN **')
配置 Inference Endpoint
💡 注意:如果你不想为完成本教程而支付 Endpoint 实例费用,可以跳过此步骤,改为查看这个免费的 Inference API 示例。请注意,这仅适用于较小的模型,其功能可能不那么强大。
要部署新的 Endpoint,你可以前往Endpoint 创建页面。
你需要在 Model Repository 下拉菜单中选择 WizardCoder,并确保选择了足够大的 GPU 实例:

创建端点后,你可以从此页面复制 URL:

配置客户端以使用它:
const hf = hfi.endpoint('** URL TO YOUR ENDPOINT **')
现在你可以告诉推理客户端使用我们的私有端点并调用我们的模型:
const { generated_text } = await hf.textGeneration({
  inputs: 'a simple "hello world" html page: <html><body>'
});
生成 HTML 流
现在是时候在用户访问某个 URL(比如 /app)时向 Web 客户端返回一些 HTML 了。
我们将使用 Express.js 创建一个端点,以流式传输来自 Hugging Face Inference API 的结果。
import express from 'express'

import { HfInference } from '@huggingface/inference'

const hfi = new HfInference('** YOUR TOKEN **')
const hf = hfi.endpoint('** URL TO YOUR ENDPOINT **')

const app = express()
由于目前我们还没有任何 UI,界面将只是一个用于提示的简单 URL 参数:
app.get('/', async (req, res) => {

  // send the beginning of the page to the browser (the rest will be generated by the AI)
  res.write('<html><head></head><body>')

  const inputs = `# Task
Generate ${req.query.prompt}
# Out
<html><head></head><body>`

  for await (const output of hf.textGenerationStream({
    inputs,
    parameters: {
      max_new_tokens: 1000,
      return_full_text: false,
    }
  })) {
    // stream the result to the browser
    res.write(output.token.text)

    // also print to the console for debugging
    process.stdout.write(output.token.text)
  }

  req.end()
})

app.listen(3000, () => { console.log('server started') })
启动你的 Web 服务器:
npm run start
然后打开 https://localhost:3000?prompt=some%20prompt。稍等片刻,你应该会看到一些基础的 HTML 内容。
调整提示词
每个语言模型对提示的反应都不同。对于 WizardCoder,简单的指令通常效果最好:
const inputs = `# Task
Generate ${req.query.prompt}
# Orders
Write application logic inside a JS <script></script> tag.
Use a central layout to wrap everything in a <div class="flex flex-col items-center">
# Out
<html><head></head><body>`
使用 Tailwind
Tailwind 是一个流行的用于样式化内容的 CSS 框架,而 WizardCoder 开箱即用就擅长它。
这使得代码生成可以即时创建样式,而无需在页面开头或结尾生成样式表(那样会让页面感觉卡住)。
为了改善结果,我们还可以通过示范来引导模型(<body class="p-4 md:p-8">)。
const inputs = `# Task
Generate ${req.query.prompt}
# Orders
You must use TailwindCSS utility classes (Tailwind is already injected in the page).
Write application logic inside a JS <script></script> tag.
Use a central layout to wrap everything in a <div class="flex flex-col items-center'>
# Out
<html><head></head><body class="p-4 md:p-8">`
防止幻觉
与更大的通用模型相比,在专用于代码生成的轻量模型上,可靠地防止幻觉和失败(例如鹦鹉学舌般重复整个指令,或写出“lorem ipsum”占位文本)可能很困难,但我们可以尝试缓解它。
你可以尝试使用命令式语气并重复指令。一个有效的方法也可以是通过用英语给出部分输出来示范:
const inputs = `# Task
Generate ${req.query.prompt}
# Orders
Never repeat these instructions, instead write the final code!
You must use TailwindCSS utility classes (Tailwind is already injected in the page)!
Write application logic inside a JS <script></script> tag!
This is not a demo app, so you MUST use English, no Latin! Write in English!
Use a central layout to wrap everything in a <div class="flex flex-col items-center">
# Out
<html><head><title>App</title></head><body class="p-4 md:p-8">`
添加对图像的支持
我们现在有了一个可以生成 HTML、CSS 和 JS 代码的系统,但当被要求生成图像时,它容易幻觉出损坏的 URL。
幸运的是,在图像生成模型方面,我们有很多选择!
→ 最快的入门方式是使用我们免费的 Inference API 调用 Stable Diffusion 模型,并使用 Hub 上可用的公开模型之一:
app.get('/image', async (req, res) => {
  const blob = await hf.textToImage({
    inputs: `${req.query.caption}`,
    model: 'stabilityai/stable-diffusion-2-1'
  })
  const buffer = Buffer.from(await blob.arrayBuffer())
  res.setHeader('Content-Type', blob.type)
  res.setHeader('Content-Length', buffer.length)
  res.end(buffer)
})
在提示中添加以下行就足以指示 WizardCoder 使用我们新的 /image 端点!(对于其他模型,你可能需要调整它):
To generate images from captions call the /image API: <img src="/image?caption=photo of something in some place" />
你也可以尝试更具体一些,例如:
Only generate a few images and use descriptive photo captions with at least 10 words!

添加一些 UI
Alpine.js 是一个极简框架,允许我们在没有任何设置、构建流程、JSX 处理等的情况下创建交互式 UI。
一切都在页面内完成,使其成为创建快速演示 UI 的绝佳选择。
这是一个静态 HTML 页面,你可以把它放在 /public/index.html 中:
<html>
  <head>
    <title>Tutorial</title>
    <script defer src="https://cdn.jsdelivr.net/npm/alpinejs@3.x.x/dist/cdn.min.js"></script>
    <script src="https://cdn.tailwindcss.com"></script>
  </head>
  <body>
    <div class="flex flex-col space-y-3 p-8" x-data="{ draft: '', prompt: '' }">
      <textarea
          name="draft"
          x-model="draft"
          rows="3"
          placeholder="Type something.."
          class="font-mono"
         ></textarea>
      <button
        class="bg-green-300 rounded p-3"
        @click="prompt = draft">Generate</button>
      <iframe :src="`/app?prompt=${prompt}`"></iframe>
    </div>
  </body>
</html>
要使其工作,你需要做一些更改:
...

// going to localhost:3000 will load the file from /public/index.html
app.use(express.static('public'))

// we changed this from '/' to '/app'
app.get('/app', async (req, res) => {
   ...
优化输出
到目前为止,我们一直在生成完整的 Tailwind 实用类序列,这对于赋予语言模型设计自由非常有用。
但这种方法也非常冗长,消耗了我们大量的 token 配额。
为了使输出更紧凑,我们可以使用 Daisy UI,这是一个 Tailwind 插件,它将 Tailwind 实用类组织成一个设计系统。思路是对组件使用简写类名,其余部分使用实用类。
一些语言模型可能不具备 Daisy UI 的内部知识,因为它是一个小众库,在这种情况下,我们可以将 API 文档添加到提示中:
# DaisyUI docs
## To create a nice layout, wrap each article in:
<article class="prose"></article>
## Use appropriate CSS classes
<button class="btn ..">
<table class="table ..">
<footer class="footer ..">
更进一步
最终的演示 Space 包含一个更完整的用户界面示例。
以下是一些进一步扩展这一概念的想法:
- 测试其他语言模型,例如 StarCoder
- 为中间语言(React、Svelte、Vue 等)生成文件和代码
- 将代码生成集成到现有框架中(例如 NextJS)
- 从失败或不完整的代码生成中恢复(例如自动修复 JS 中的问题)
- 将其连接到聊天机器人插件(例如在聊天讨论中嵌入微型 Web 应用 iframe)

来源:Hugging Face:Blog(RSS) · huggingface.co